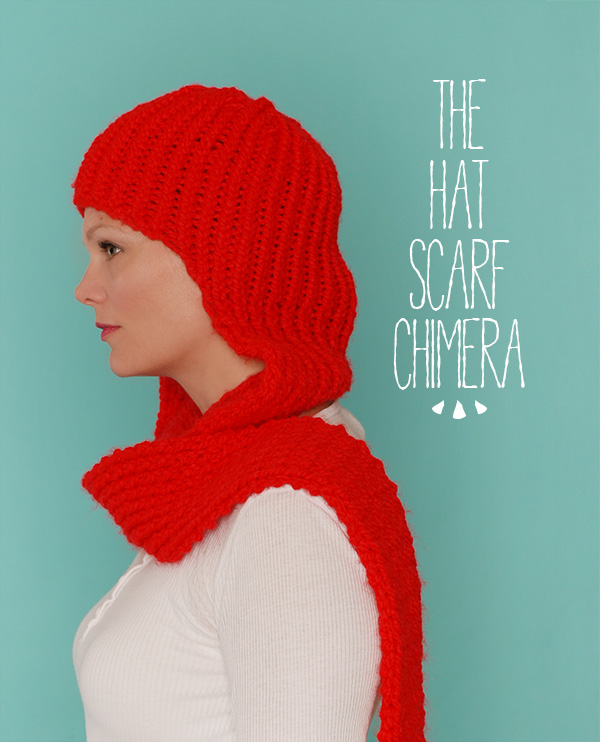
Back in my child free days, I always developed a case of post-Christmas letdown come January. No more pretty lights, no more presents, nothing to look forward to and it’s so damn cold. Post-kid, January is more about post-Christmas exhaustion. You spend the month before making magical holiday memories for them and then they have almost 3 weeks off from school and need to be entertained for 14 hours a day. When school started up again last week I slept for 2 days.
So here are a few things I have been doing instead of blogging this past week: packing up Christmas stuff (so long, elf!), trying out new soup recipes, internally debating whether to get bangs and/or another dog, sleeping in my clothes to avoid having exposed skin for even 5 seconds and selfishly knitting only for myself.
I usually employ a little magical thinking to justify the countless hours I spend clacking needles. It goes like this: I am saving money I would have spent on this sweater/hat/socks/scarf by making it instead of buying it. If I want to buy an $80 scarf, and instead buy $5 of yarn and knit it instead, I saved $75, right? It sounds totally reasonable until you factor in the time spent making said item. If it takes me 10 hours to make this money saving scarf, I have just worked for 7.50 an hour, which is less than the minimum wage. Now think about the 50 hour sweater. And that’s using the cheap yarn. If you’re the type that buys $60 worth of premium alpaca yarn to make socks, you shouldn’t even try this kind of logic.
But since my job consists of raising a small human, and pays exactly zero (at least in dollars; I am rich in kisses and boogers), it still works out. And what else is there to do during a polar vortex? So I made this hat/scarf combo to keep the arctic winds from chilling the back of my neck, which always ends up exposed through the crack between traditional hat and scarf. The scarf ends are long enough to wrap around your neck and still cover your chest for extra warmth and the bright color helps chase away the winter blues. And since it is knit with bulky yarn, it’s a quick project, even if you’re a slow knitter like me. Just in time for the next polar vortex coming later this week.
supplies:
- size 13 straight needles
- size 13 double pointed needles
- 3 skeins Loops & Threads Charisma #28 true red, or other bulky yarn
- yarn needle
- 3 feet scrap yarn in contrasting color
gauge:
14 stitches x 14 rows= 4″
This makes a hat sized small/medium. To make a larger hat, start with 16 cast on stitches instead of 14. Add 1/2 to 1″ extra to the hat length before starting the crown shaping.
instructions:
(each new line in the pattern represents a new row)
Cast on 14 stitches onto straight needles.
K1, P1 across row
make 1 purl-wise, k1. p1 across row, then make 1 knit-wise
make 1 knit-wise, continue p1, k1 across row, then make 1 purl-wise
continue k1, p1 rib for 32″
make 1 purl-wise, work across row in rib stitch
work across next row, then make 1 purl-wise
thread yarn needle with scrap yarn, thread through loops on needle, take off needle and set aside
Repeat pattern to make 2nd scarf piece until it reaches 32″
then, work across row in rib stitch, then make 1 knit-wise
make 1 knit-wise, then work across row

work across row in rib stitch, place other scarf piece onto needle with made stitches facing the existing scarf piece, and work in rib stitch across second piece with the yarn from the first piece. Cut other yarn, leaving 6″ tail.

work in rib stitch for 4 & 1/2″
next 3 rows:
make 1 purl-wise, work in rib stitch across, make 1 knit-wise
make 1 knit-wise, work in rib stitch across, make 1 purl-wise
make 1 purl-wise, work in rib stitch across, make 1 knit-wise

cast on 21 stitches from end or row (make sure you have an even number of stitches total, cast on 1 less if you need to)
place stitch marker at last cast on stitch and transfer all stitches to double pointed needles
work in rib stitch pattern for 5″

crown shaping:
*K1, P1, K1, P1, K2tog* repeat from * to * to last stitch, K1
K1, P1, K1, P1, *K2, P1, K1, P1* repeat from * to * to last stitch, K1
*K1, P1, K1, K2tog; P1, K1, P1, K2tog* repeat from * to * to end of round
*K1, P1, K2tog; P1, K1, K2tog*, repeat from * to * to end of round
*K1, P1, K2tog; K2, K2tog, K1, P1, K2tog* repeat from * to * to last stitch, K1
K1, P1, K2tog;* K or P 2 stitches, depending on their stitch, k2tog* repeat from * to * to last stitch, K1
*K1, K2tog* repeat from * to * to last stitch, K1
Knit 1 round
cut yarn, leaving a 6″ tail. Thread yarn onto yarn needle, and thread yarn through the remaining loops. Take loops off needles and pull tight to close. Weave in end.
Weave in all other yarn ends.


Pingback: Химера шарфа шляпы | Вязание спицами и крючком
thanks for making pdf available … i live in Maine and we’re having our 4th blizzard in 10 days … really need to make this for myself!
Thank you for this wonderful hat I have been looking for this type of pattern for a long time.
Do you have this in crochet pattern?
Sorry, only knitting.
I have been looking for a hooded scarf pattern to knit- thanks for including step by step photos- this seems very doable!
Thanks, Margo!