

Most of my friends I’ve met through ordinary channels: work, school, mutual friends. I met my husband that way. Graham I met a little differently.
2 years ago, my husband and I were looking for a new apartment. We saw an ad on Craigslist for a sublet-the couple had bought a house and were looking for someone to take over the lease. It sounded great: right neighborhood, right price range…We answered the ad and made a plan to see it. The apartment was great, but the sub-letters were better. And that was Graham and his wife, Jessica. After looking at the apartment, Graham offered us one of their home brewed beers. We said yes(of course!) and stayed and hung out for about an hour. After we left, my husband and I talked about how great they were and how we hoped it worked out.
Well, the apartment didn’t work out; the landlord wouldn’t take our dog. But Graham then sent us an email. It said how much they liked hanging out with us and would we want to do it again? I don’t know about you, but I would never have had the balls to do that. My husband and I would have gone home, and would have talked from time about how great they were, but would have never have done anything about it. This is one of the ways that Graham is an exceptional person. And that’s why I’m thrilled he agreed to write my first guest post.
Besides his lack of social phobias and mad home brewing skills, he is a fashion designer, train aficionado, painter, taxidermy enthusiast and extremely skilled furniture remodeler (you should see his home made kegorator!). I frequently think of Graham as living on a different frequency than most people, in the best possible way.
And before I let him begin, I need to say one more thing: he is married to his equal. Jess will be writing a guest post come November (see it here).
Graham:
As an urbanite I often find myself perusing the discarded remains from defunct homes & businesses.
Whether they be curbside or backside. This mentality brings about an eclectic variety of keepsakes from bygone era’s.
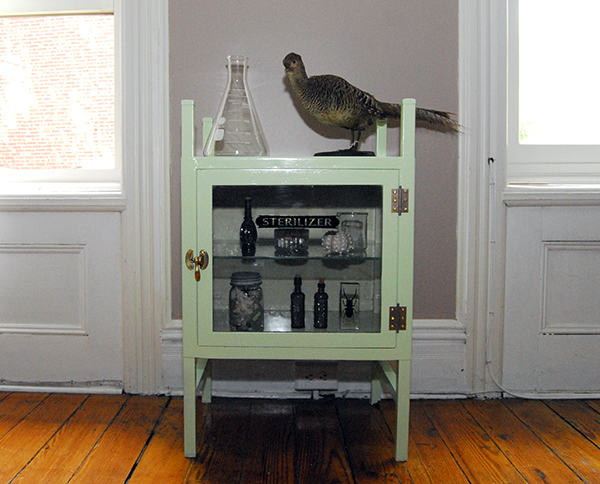
Take for instance this medical cabinet. Upon sight most would shy away from such a rusty piece for fear of tetanus or some latent strain of bacteria baked within it’s peeling enamel walls, but maybe that’s just another thing which separates me from most people.

It’s something that I take pride in, I see what others fail to. Even though I knew it would lead to a lot of work in what most would call unworkable conditions 100 degree heat in the seminal stages of July 2013, nevertheless I decided to embark.
Upon sight I called up my friend Krista, the proprietor of this very blog to assist in transporting the cabinet to my home/workshop.
I’m fortunate to have friends such as her, who are all the more willing to assist in carting the cumbersome pieces I’ve run across in my travels.
I’ll spare you the details of what the cabinet was filled with. Suffice to say it would churn the stomachs of most. The facade was pitted with structural rust, and what of the enamel which remained was peeling & flaked.
On the driest day we had, I set to work on the stripping, using a combination of both chemicals & mechanized strippers.

For the preliminary strip – I thought a wire brush attached to a drill would be sufficient… it was NOT, so I switched to the tried & untrue Citri-Strip, Not as odiferous as other strippers, but also NOT as effective –as a standalone stripper it leaves much to be desired, and the cleanup is Hell. I’m sure it’s suitable for some jobs, but none that I’ve encountered. It was really just what I had on hand.

After the initial brush application and impatiently waiting for close to an hour for blisters to appear on the enamel, I took to stripping away what I could with a paint scraper and hand held wire brush. It made a dent in the enamel that was less pitted & cracked, but the more distressed enamel required a second coat of the stripper & additional scraping. I got off as much as I could with this means and resolved to clean the surface of any remaining stripper using odorless mineral spirits – because I can’t stomach the smell of the scented stuff. It just got that much more messy in the removal; I really hate Citri-strip! Last resort in hand – I brought out the big guns and sprayed the thing with good old fashioned water & a garden hose. Ordinarily I wouldn’t do this with metal due to the potential onset of additional rust– but in the early afternoon in the midst of a heat wave – I decided to take my chances and let the sun do what it does best & dry things up. That seemed to do the trick!
The next day; I woke with the sun- wire brush on drill I set to work on the cabinet with purpose, I was determined to get it down to bare metal before the sun got to high in the sky. Thankfully I was successful at this task. I alternated between the wire brush and my orbital sander with 80 grit paper. They both had their functions – the wire brush was better for working smaller spaces for detail work, the sander was better for larger areas.

When the sun was sinking low around 8pm – I returned to the cabinet, having thoroughly taped off the glass on the door and removed whatever dust had gathered from the sanding earlier in the day. For the primer coat I had selected Krylon Cold Galvanizing spray. This stuff is great & about the only good product that this company makes in my opinion. All their other paint is watery garbage! But the Galvanizing spray did the trick – it dries fast and really protects metal as evident from the bike frame I’ve used it on, which has been running strong for 3+ years of rainy summer rides. I’m a fan of color though and wanted the cabinet to really pop! Not that primer grey isn’t awesome – sometimes it really makes a statement – but for the sake of replicating the color this cabinet would have been in the period when it was first welded, I needed a nontraditional color.

After extensive meetings with my CFO (the Mrs.) and Eat Knit & DIY’s own Krista Winters, we came to the decision that a pale surgical green would be the way to go. I could only scrounge up two cans of the color we had selected, so I opted to paint the inside of the cabinet using Rustoleum: Painters Touch “Navajo White”, (not sure why it’s called that, but I’m not clever enough to work for the color naming committee at Rustoleum). It’s good paint and affordable. The green color was expensive when I had bought it years before and was more than likely discontinued for just that reason. I applied 2-3 light coats to the inside/ outside of the cabinet & let it dry for 2 days.
Next on the list – reattaching the hardware that I had stripped & polished separately… hinges & door clasp. The screws for both needed to be replaced because they were heavily caked with paint and would have been too labor intensive to fully strip. Easy you’d think… “buy new screws” this would have been easier if the mom & pop hardware I went to wasn’t charging $2 a screw for brass screws… I’m all about local business, but screw that! Home Depot it was; for the obligatory 3rd visit for this project. They had the right size & thread pattern, but not the right length (needed ¼”, shortest they had was ¾”). Having been through this before I had just the right tool at my disposal… the trusty bolt cutter! Good for chain link fences, nincompoops who lock to your bicycle while you’re at work & of course… Bolts ;). Done Deal!
I’m a stickler for details and I wanted this thing to not just look the part – I wanted it to state it’s initially intended purpose, so I set to work on designing a decal – looking at references on the net; I decided upon one that looked period appropriate and set to work replicating it in Adobe Illustrator a program I have a working knowledge. I emailed my design off to 3 different online decal printers and after getting a range of $50 – $100 – I decided to go cheap and it worked out just fine. Who needs to pay NY prices for decals when smaller companies in Florida (speedysigns.com) can do the same work with less overhead. They’re more pleasant to deal with and sent me extra pieces just in case the application got botched. Thankfully the stripper fumes had yet to destroy my nervous system so I was able to get the decal applied as I wanted it on the 1st try; Science be Damned!


Hope you too can appreciate the finished product after the hours of labor which went into it’s rebirth.
Cheers!
-Graham
This is so incredible! I have a soft spot for old medical furniture, and as a budding taxidermist, the bird perched on top is an amazing touch!
Thank you for sharing this, it gives me a lot of inspiration to look for something less than perfect, and bring it back to life!
Pingback: Jess's sweet potato puffs eat, knit & diy
I applaud your determination and love the outcome. As a physician, I am thrilled that you gave it a new life and purpose.