

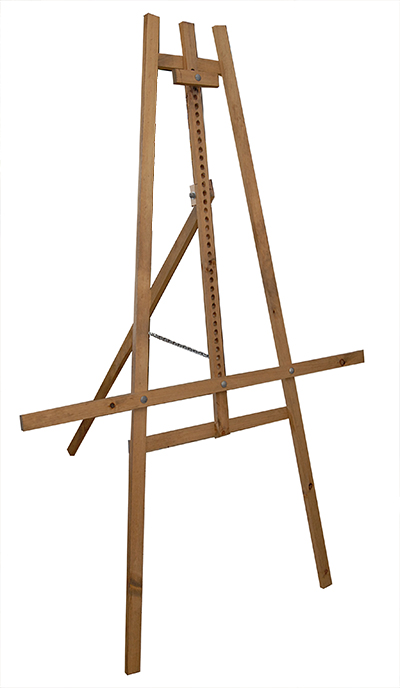
Back in the days of art school, I made large, abstract paintings that frankly, sucked. (I also made steel sculptures of cows, but that’s a different post). I haven’t painted since. But lately, I have been feeling the urge to pick a brush again. Paint and brushes and canvas I found on the cheap, but easels are another story! Since my record of oil and acrylic endeavors didn’t warrant a expenditure of several hundred dollars, I decided to make my own art easel. I did some stealth investigating in the local art stores, and came up with my design. I didn’t want anything complicated, just sturdy. And big enough to accommodate large canvases in case my muse(or actual talent) struck me! This did the trick. It cost under $30(I already had the stain and sandpaper), and if you decide not to stain it, you can get this finished in less than 2 hours.
supplies:
- 5- 1″ x 2″ x 6′ lumber pieces
- 5- 3″ carriage bolts with matching washers and nuts
- 16- phillips head wood screws (1 1/4″)
- 2- small hook and eyes
- 1- 3′ length lightweight chain
- medium grit sandpaper
- masking tape
- wood stain(optional)
- small foam brush(optional)
tools:
- drill gun
- drill bit slightly larger than carriage bolt
- 5/64 drill bit
- phillips head drill bit
- c-clamp
- level
- tape measure
I bought all my supplies at the home depot. I went there because they will make the cuts for you, which is fantastic for me since I don’t own or have room for a table saw. The cuts also fell into the 2 cuts free rule, so I didn’t even have to pay for them. Use the diagram below to know what to have them cut. You will have 10 pieces of wood:
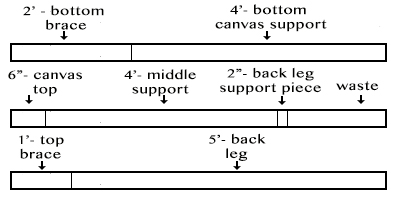
- 2- 6′ long(uncut)-front legs
- 1- 2″ long- back leg support piece
- 1- 6″ long-canvas top brace
- 1- 12″ long-top crossbeam
- 1-2′ long-bottom crossbeam
- 1-4′ long-canvas bottom brace
- 1-4′ long-middle support
- 1-5′ long-back leg
- 1-16″ long-waste piece(save this piece! it will come in handy later.)
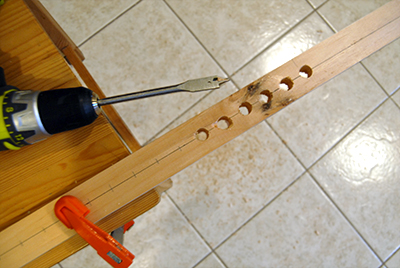 Begin with the middle support. Use a ruler to find the vertical center of the wood. Draw a line down the vertical center of your wood. Starting 6″ from the top, make horizontal marks every 1″ until you reach 6″ from the bottom. I have 37 marks on my piece. Using a drill bit slightly larger than your carriage bolt, drill a hole at each mark. This is what you will attach your top and bottom canvas supports to. Sand any splinters off and erase pencil lines. I stained my wood at this step, but you can skip it if you want.
Line up the front legs with the middle support between them, aligning the tops so they are even.
Line up the top crossbeam across the legs and middle support, 4″ from the top.
Line up the bottom crossbeam so it is flush with the bottom of the middle support.
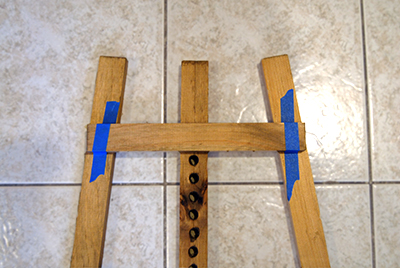 Now angle the legs so the ends of the supports are on the legs. Your legs will be angled into a V shape. Tweak your legs to make sure they are at the same angle, and use a level to make sure the tops of the legs are still even. Tape the crossbeams in place on the legs to keep them from shifting. Attach the crossbeams to the legs with wood screws. I drilled right through the tape.
Line up the middle support so it is even between the legs and flush with the bottom crossbeam. It should be UNDER your crossbeams. (This is going to be the backside of your easel, so if their is a better looking side to your middle support, face it away from you.). Tape the middle support in place, and attach the the crossbeams with wood screws.
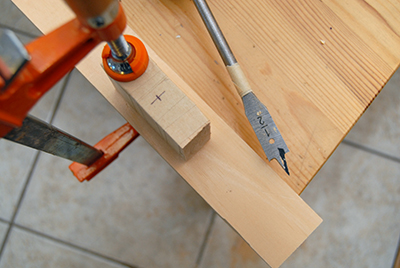 Take your back leg support piece and make a mark 1″ from the top on the short side of the wood. The mark the vertical center of the wood to make your “+” mark. Drill a hole for your carriage bolt through the “+” mark. To do this without drilling into the surface I clamped to, I put my piece of waste wood below the back leg support piece, then clamped them both to the surface. Then I measured the length of my wood on my drill bit and marked it with a piece of tape. When the tape edge is flush with your back leg support piece, stop drilling.
Measure 10″ from the top of the middle support and align the top of the back edge support piece. Your drilled hole should be on the side. Screw into place.
Drill a hole in the middle of the wide edge of your back leg, 3/4″ from the top.
Drill a hole in the middle of the wide edge of your canvas top brace.
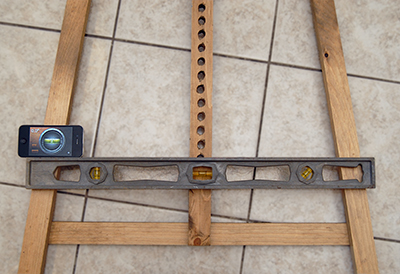 Drill a hole in each front leg, parallel to the bottom hole in your middle support. Measure this carefully! They need to be level! I used a level and the level of my iphone (an excellent app) to make sure it was exact.
Drill a hole in the middle of the bottom canvas brace. Use a carriage bolt to attach it to the bottom hole of the middle support. Flip the easel over and use a pencil to trace the outlines of the holes in your front legs(make sure bottom canvas edge is level!) Remove bottom canvas brace from easel frame. Mark centers of the drawn pencil circles and drill holes.
Attach bottom canvas brace to easel using 3 carriage bolts.
Attach top canvas brace to easel with 1 carriage bolt.
Attach back leg to support piece with 1 carriage bolt.
 Attach a hook the the backside of the middle support piece, 9″ from the bottom. Attach 2nd hook to the back leg on the side facing the middle support, approximately 30″ up from the bottom (this does not have to be exact). Attach chain to hooks, connecting them at the link that gives you the angle you want your canvas to be at. You will have extra chain.
tip:
- I bought the least expensive wood, which was ash. It tended to splinter. Wrapping the wood in tape and drilling slow minimizes this. Or you can buy a harder type of wood. It just costs more.
- if you have hardwood floors, you can put some duct tape on the bottom of the feet to minimize slipping.
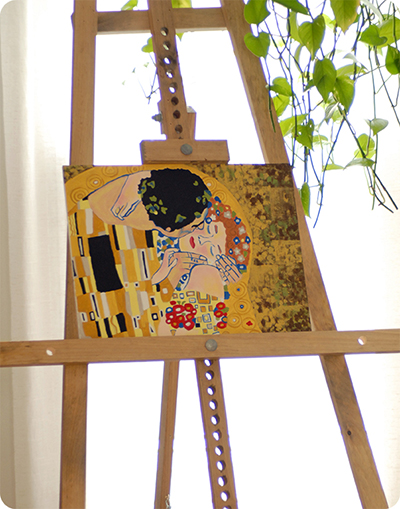
The painting on the easel is a paint by numbers kit I got for Christmas. You can find it Amazon.
Pingback: Art Supplies for Poor Artists - J.V Krakowski
.. I just noticed that I bought the wrong size of wood. I bought .75″ x 1.5″ x 6′ I guess a 1/2 wood spade bit would be unusable now. What size do you recommend should I use?
Good day sir/ma’am
I was looking for a DIY easel plan and stumbled upon this website. Good concept, I’m trying to make one for my GF now. Although I do have some questions about the easel:
1.) In the last bottom image, the bottom canvass support has three carriage bolt, and it’s attached to the LH & RH leg. In the first top image, the canvass support is only attached to the mid canvass support. Is there no need for me to put additional attaching holes in the LH & RH leg for the bottom canvass support?
2.) The back-leg support piece. Can I please get a clear image how it should be attached to the mid canvass support? I don’t quite understand how it should be attached. :/
3.) The 16 pcs screws, I don’t know where I should attach them all. Can I get an instruction where I should use them? From the looks of it, this easel only needs 6-8 pcs attaching screws.
Sorry if I’m asking dumb and pointless questions.. I’m not so good with wood crafts.. but I want to make this one specially for my GF’s birthday gift this July 20. Hope to get a response from you. Any tips would be gladly appreciated.
sic, what a great boyfriend you are to make this for your girlfriend. It’s a simple project. Hopefully, you’ve already worked through your questions. Will try to answer the ones you had: 1) the carriage bolts in the bottom canvas support only attach in three places in the bottom position. The rest of the time they attach only in the middle. I designed it this way for extra large and heavy canvases that would be in the lowest position. 2) As long as you attach the back support piece in a way that it doesn’t poke the canvas when it’s at an angle, you’ll be fine. 3) use as many screws as you need to make it stable at the connection points. And finally, use a bit that will fit your carriage bolts and give you some room on each side of the hole. Good luck to you! I hope it works out for you and your girlfriend loves it!